To prevent data entry in a cell in Excel, use Data Validation. Go to the Data tab, select Data Validation, and choose “Custom.”
Excel is a powerful tool for data management and analysis. One essential feature is the ability to control user input, ensuring data integrity. Preventing data entry in specific cells can be crucial for maintaining accurate records. Data Validation helps you achieve this by setting rules that restrict or prohibit data entry.
This feature is straightforward to use, making it accessible even for beginners. Whether you are protecting formulas, restricting input ranges, or simply locking cells, Data Validation provides a reliable solution. Keep your data clean and error-free by leveraging this versatile Excel function. It enhances efficiency and accuracy in your spreadsheets.
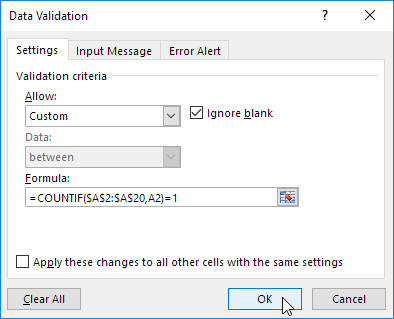
Credit: www.excel-easy.com
Introduction To Excel Data Protection
Excel is a powerful tool for data management. Protecting data in Excel is crucial. Unauthorized changes can lead to errors. You can prevent data entry in specific cells. This ensures data integrity.
The Importance Of Data Security
Data security keeps your information safe. It prevents unauthorized access. This is vital for sensitive data. It helps maintain data accuracy. Protecting cells can prevent accidental changes. This ensures reliable data analysis.
Common Scenarios For Locking Cells
There are many reasons to lock cells. Here are some common scenarios:
- Formulas: Protect cells with important formulas.
- Headers: Prevent changes to column and row headers.
- Read-Only Data: Lock cells containing static information.
- Templates: Ensure template cells remain unchanged.
To lock cells, follow these steps:
- Select the cells you want to protect.
- Right-click and choose “Format Cells.”
- Go to the “Protection” tab.
- Check the “Locked” checkbox.
- Click “OK.”
- Finally, protect the sheet from the “Review” tab.
Use these steps to enhance your data security in Excel. Protecting your cells is easy and effective.

Credit: www.extendoffice.com
Starting With Excel Basics
Excel is a powerful tool for data management. Understanding the basics helps you prevent data entry errors. We’ll explore key techniques to manage data entry in cells.
Understanding Cell Properties
Each cell in Excel has unique properties. These include data type, formatting, and validation rules. Adjusting these properties can prevent incorrect data entry.
Data Type: Ensure the cell accepts only the correct data type. For example, a date cell should not accept text.
Formatting: Format cells to display data correctly. This includes currency, percentages, and dates. Proper formatting enhances data clarity.
Validation Rules: Use data validation to set rules for data entry. You can restrict the type of data entered. For example, limit a cell to accept only numbers between 1 and 100.
| Property | Description |
|---|---|
| Data Type | Specifies the type of data a cell can hold. |
| Formatting | Controls how data is displayed in the cell. |
| Validation Rules | Sets conditions for data entry. |
The Role Of Worksheet Protection
Worksheet protection is essential for data integrity. It prevents unauthorized changes to your data. Protecting a worksheet involves several steps.
- Select the cells you want to lock.
- Right-click and choose Format Cells.
- Go to the Protection tab and check Locked.
- Protect the worksheet by clicking on Review and then Protect Sheet.
- Set a password for added security.
Locked cells can’t be edited. This ensures data remains accurate. Only authorized users can make changes.
By understanding these basics, you can maintain data integrity in Excel. Proper cell properties and worksheet protection are key to preventing data entry errors.
Methods To Prevent Data Entry
Preventing data entry in Excel is crucial. It helps maintain data integrity and accuracy. Here, we explore two methods. These methods are easy to use and effective.
Using Format Cells Dialog
The Format Cells Dialog is a simple way. Follow these steps:
- Select the cell or cells.
- Right-click and choose Format Cells.
- Go to the Protection tab.
- Check the Locked checkbox.
- Click OK.
- Now, protect the sheet. Go to Review and click Protect Sheet.
These steps will lock the cells. Users cannot enter data in locked cells.
Employing Data Validation Feature
The Data Validation Feature is versatile. It can prevent data entry too. Follow these steps:
- Select the cell or cells.
- Go to the Data tab.
- Click Data Validation.
- In the dialog box, select Custom.
- Enter the formula
=FALSE. - Click OK.
This feature disallows any entry. Users get an error message if they try.
Advanced Techniques For Cell Protection
Ensuring data integrity in Excel is crucial. Advanced techniques can help. These methods prevent unwanted data entries in specific cells. Protecting cells can save time and reduce errors. Learn how to create custom rules and use macros for enhanced security.
Creating Custom Data Entry Rules
Custom data entry rules ensure only valid data is entered. These rules can restrict the type of data in a cell. Follow these steps to create custom rules:
- Select the cells you want to protect.
- Go to the Data tab.
- Click on Data Validation.
- In the Settings tab, choose the type of validation.
- Set your criteria, such as whole numbers or text length.
- Click OK to apply the rule.
Using these steps, you can create precise rules. This method ensures data consistency and accuracy.
Leveraging Macros For Enhanced Security
Macros can automate tasks and enhance security. They allow complex rules and checks. Follow these steps to create a macro for cell protection:
- Press Alt + F11 to open the VBA editor.
- Insert a new module by clicking Insert > Module.
- Enter the macro code:
                Sub ProtectCell()

                ActiveSheet.Unprotect Password:="yourpassword"

                Range("A1").Locked = True

                ActiveSheet.Protect Password:="yourpassword"

End Sub - Press F5 to run the macro.
This macro locks a specific cell and protects the sheet. You can customize the range and password as needed. Using macros, you can create advanced protection schemes.
Managing Permissions For Collaborative Work
Managing permissions in Excel ensures everyone follows the same rules. This is crucial for collaborative work. It helps maintain data integrity and prevents unwanted changes. Let’s explore how to set up restrictions and work with protected ranges.
Setting Up User-specific Restrictions
Excel allows setting up user-specific restrictions to control who can edit certain cells. This feature is useful for maintaining data accuracy.
- Open your Excel sheet.
- Go to the Review tab.
- Click on Allow Users to Edit Ranges.
- Select New to create a range.
- Enter the range name and cells.
- Set the Permissions by adding specific users.
- Click OK to save.
By setting these restrictions, only assigned users can edit the specified cells.
Working With Protected Ranges In Shared Sheets
Shared sheets often require more security measures. Protected ranges help in managing access effectively.
Follow these steps to protect ranges:
- Open your shared Excel sheet.
- Select the cells you want to protect.
- Right-click and choose Format Cells.
- Go to the Protection tab and check Locked.
- Click OK to apply.
- Go to the Review tab and click Protect Sheet.
- Set a password and specify the permissions.
- Click OK to activate protection.
Use the table below for quick reference:
| Action | Steps |
|---|---|
| Set User-specific Restrictions |
|
| Protect Ranges |
|

Credit: www.quora.com
Troubleshooting Common Protection Issues
Protecting cells in Excel is crucial for data integrity. But issues can arise. Let’s delve into troubleshooting common protection issues to ensure seamless workflow. This guide covers resolving locked cell complications and handling forgotten passwords.
Resolving Locked Cell Complications
Locked cells can create problems if not managed well. Follow these steps to resolve common issues:
- Go to the Review tab.
- Click on Unprotect Sheet.
- Select the cells you need to unlock.
- Right-click and choose Format Cells.
- Go to the Protection tab and uncheck Locked.
- Protect the sheet again by clicking Protect Sheet.
These steps ensure only the necessary cells remain protected. It helps maintain data security without hindering workflow.
Handling Forgotten Passwords
Forgetting a password can lock you out of crucial data. Here are steps to manage this issue:
- Open the Excel file.
- Save the file as an XML Spreadsheet.
- Open the saved XML file with a text editor.
- Search for the SheetProtection tag.
- Delete the entire SheetProtection tag line.
- Save the XML file and open it in Excel again.
By following these steps, you can regain access to your data. Always keep a record of your passwords to avoid future issues.
Frequently Asked Questions
How Do You Protect Cells From Data Entry In Excel?
To protect cells from data entry in Excel, select the cells, go to “Review” tab, click “Protect Sheet”, and set a password.
How Do I Lock Cells In Excel Until Data Is Entered?
To lock cells in Excel until data is entered, use Data Validation. Set criteria and apply conditional formatting. This ensures cells remain locked until the correct data is inputted.
How Do I Lock Individual Cells In Excel Without Protecting The Sheet?
Select the cells you want to lock. Right-click and choose “Format Cells. ” Go to the “Protection” tab. Check “Locked. ” Click “OK. “
How To Protect Particular Cells In Excel?
Select cells to protect. Right-click and choose ‘Format Cells’. Go to the ‘Protection’ tab and check ‘Locked’. Click ‘OK’. Then, protect the sheet by clicking ‘Review’ > ‘Protect Sheet’ and setting a password.
Conclusion
Mastering cell data entry prevention in Excel boosts your productivity. Utilize these techniques to ensure data accuracy. Implementing these methods will save time and reduce errors. Remember to practice and refine your skills regularly. Excel’s features can greatly enhance your data management efficiency.
Happy Excel-ing!