Are you new to PowerPoint and unsure where to start? You’re in the right place. This PowerPoint tutorial for beginners will guide you step-by-step to create clear, professional presentations quickly. Imagine impressing your audience with slides that look great and share your message perfectly. By the end of this article, you’ll feel confident using PowerPoint tools that make your work easier and your presentations more powerful.
Keep reading to unlock simple tips and tricks that anyone can master.
Getting Started With PowerPoint
Starting with PowerPoint is a simple and enjoyable experience. This tutorial helps beginners learn the basics of PowerPoint. You will get to know how to open the program, create slides, and save your work. These initial steps lay a strong foundation for creating effective presentations. Let’s explore how to get started with PowerPoint easily.
Navigating The Interface
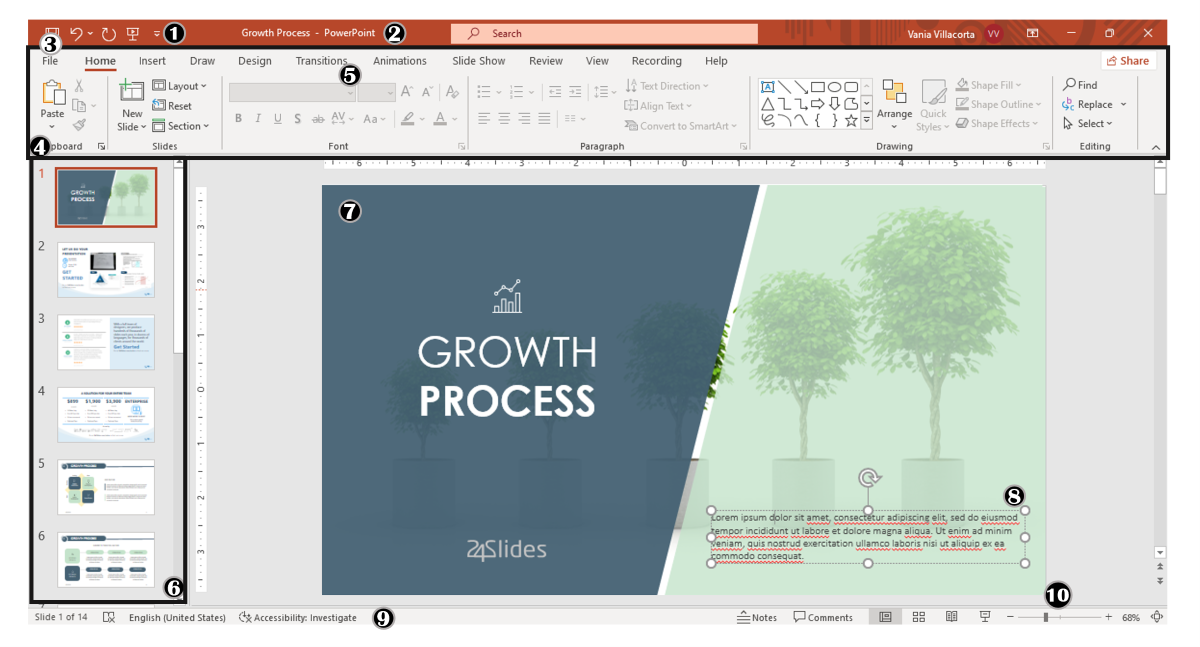
The PowerPoint interface has many parts. Knowing each part helps you work more efficiently.
- Ribbon: This is the top bar with tabs like Home, Insert, Design, and more. Each tab has buttons to add or change things in your slides.
- Slides Pane: On the left side, you see small images of all your slides. Click any slide to edit it.
- Slide Workspace: The big area in the middle. This is where you add text, pictures, and shapes to your slide.
- Notes Pane: At the bottom, you can write notes for each slide. These notes help you during your presentation.
- Status Bar: Located at the bottom of the window, it displays the slide number, theme, and view options.
Here is a simple table to explain the main parts:
| Part | Location | Purpose |
|---|---|---|
| Ribbon | Top | Tools and commands |
| Slides Pane | Left | View and select slides |
| Slide Workspace | Center | Edit slide content |
| Notes Pane | Bottom | Add speaker notes |
| Status Bar | Bottom | Show slide info and view |
Spend time exploring these parts. Click buttons on the ribbon and see what they do. Use the slides pane to jump between slides. This practice makes you comfortable with the program.
Creating A New Presentation
Starting a new presentation is easy. Follow these simple steps to create your first PowerPoint file.
- Open PowerPoint. You see the start screen with options.
- Choose Blank Presentation to make a new slide deck from scratch.
- Use a template if you want a ready design. Templates save time and look professional.
- Add slides by clicking New Slide on the Home tab.
- Select a layout for each slide, such as Title Slide or Two Content.
Each slide can have:
- Text boxes for titles and points
- Images or icons
- Charts and tables
- Shapes and SmartArt
Use the ribbon to add these items. For example, click Insert > Picture to add an image. Click inside text boxes to type your content.
Tips for creating slides:
- Keep text short and clear
- Use bullet points for lists
- Choose simple colors and fonts
- Use images to explain ideas
Practice adding and arranging slides. Changing layouts helps keep your presentation interesting. This way, your slides look neat and easy to follow.
Saving And Opening Files
Saving your work prevents data loss. PowerPoint lets you save and open files easily.
To save a new presentation:
- Click the File tab in the top-left corner.
- Select Save As.
- Choose a folder on your computer to save the file.
- Type a name for your file in the File Name box.
- Click Save.
To save updates after the first time, just click the Save icon or press Ctrl + S on your keyboard.
Opening an existing presentation:
- Click the File tab.
- Select Open.
- Browse to the folder with your file.
- Click the file name.
- Click Open.
PowerPoint supports saving files in different formats. Common types include:
| Format | Description |
|---|---|
| .pptx | Standard PowerPoint file |
| Read-only document for sharing | |
| .ppt | Older PowerPoint file format |
Saving often is a good habit. It protects your work from computer crashes or power loss. Use different file names to keep multiple versions if needed.
Credit: 24slides.com
Working With Slides
Working with slides is the core of creating a PowerPoint presentation. Slides are like pages in a book. Each slide holds different information, images, or charts. Knowing how to add, delete, choose layouts, and move slides helps make your presentation clear and organized. This section teaches simple steps to manage your slides effectively. You will learn to add new slides, remove unwanted ones, pick the best layout, and change the order of slides. These skills make your presentation look professional and easy to follow.
Adding And Deleting Slides
Adding slides lets you include more content in your presentation. You start with one slide, but most presentations need many. To add a slide:
- Click the “New Slide” button in the toolbar.
- Choose the slide layout you want (discussed later).
- The new slide appears after the selected slide.
You can add as many slides as you need. PowerPoint allows quick adding to save time. Each slide can accommodate various types of content, including text, images, or videos.
Deleting slides removes slides you do not want. To delete a slide:
- Select the slide in the slide panel on the left.
- Press the Delete key on your keyboard, or right-click and choose Delete Slide.
- The slide disappears from your presentation.
Be careful when deleting. Once deleted, the slide and its content are gone unless you undo the action quickly.
| Action | Steps | Shortcut |
|---|---|---|
| Add Slide | Click “New Slide” in the Home tab | Ctrl + M |
| Delete Slide | Click “New Slide” in the Home tab | Delete key |
Choosing Slide Layouts
Slide layouts control how content is arranged on each slide. Using the right layout helps your audience understand the information easily. PowerPoint offers a variety of layouts, including title slides, bullet points, images, and charts.
To choose a layout:
- Select the slide you want to change in the slide panel.
- Click the “Layout” button in the Home tab.
- Select a layout from the list that best suits your content.
Common layouts include:
- Title Slide: Ideal for the first slide, featuring the presentation title.
- Title and Content: Perfect for text and images.
- Two Content: For comparing two sets of information side by side.
- Blank: A clean slide with no preset boxes.
Choosing the right layout saves time. You do not need to move or resize text boxes manually. Layouts keep your slides neat and consistent.
| Layout Name | Description | Best Use |
|---|---|---|
| Title Slide | Title and subtitle text boxes | First slide with presentation title |
| Title and Content | Title box and large content area | Main content slides with text or images |
| Two Content | Title box and two content areas | Compare information side by side |
| Blank | No text boxes or placeholders | Custom design or full slide images |
Rearranging Slides
Rearranging slides changes the order of your presentation. The order matters because it guides your audience through your story. Moving slides is easy and helps fix mistakes or improve flow.
Ways to rearrange slides:
- Click and drag a slide up or down in the slide panel.
- Drop it where you want the slide to appear.
- Release the mouse to position the slide in its new location.
You can also move multiple slides:
- Hold the Ctrl key and click on slides to select several.
- Drag the group to a new place in the order.
Rearranging slides helps organize ideas. Begin with an introduction, followed by the main points, and conclude with a summary. Check the slide order before you present to avoid confusion.
| Method | Steps | Tip |
|---|---|---|
| Drag and Drop | Click slide, drag up or down, release | Use slide panel on the left |
| Select Multiple Slides | Hold Ctrl, click slides, drag group | Select slides that belong together |
Adding Content To Slides
Adding content to slides is a key step in creating effective PowerPoint presentations. This process allows you to share ideas clearly and attract the audience’s attention. Content can include text, images, charts, and tables. Each type of content has a specific role and can help explain your message better. Learning how to add and arrange these elements makes your slides more interesting and easier to understand. In this section, you will learn how to insert text boxes, use images and graphics, and add charts and tables.
Inserting Text Boxes
Text boxes are the primary method for adding written information to your slides. You can use them to write titles, bullet points, or paragraphs. Text boxes are flexible; you can easily move, resize, or format them.
To insert a text box:
- Go to the Insert tab on the ribbon.
- Click Text Box.
- Click anywhere on the slide and drag to create the box.
- Type your text inside the box.
Format your text for better readability. Use these tips:
- Select a clear font, such as Arial or Calibri.
- Use a font size of at least 18 for body text.
- Make important words bold to highlight them.
- Align text left for easy reading.
Here is a simple comparison of text box properties:
| Property | Description |
|---|---|
| Size | Adjust width and height by dragging edges |
| Position | Move by dragging the box on the slide |
| Font Style | Change font, size, color, and effects |
Using Images And Graphics
Images and graphics make slides more visually appealing and help explain ideas more effectively. You can add photos, icons, or shapes to support your message. Visual content keeps the audience interested and improves understanding.
Steps to insert an image:
- Click the Insert tab.
- Select Pictures and choose from your computer or online sources.
- Click Insert after selecting the image.
- Resize and move the image as needed.
Use graphics like shapes or icons to emphasize points:
- Go to Insert > Shapes to add circles, arrows, or rectangles.
- Use Icons for simple symbols that represent ideas.
- Color and size graphics to match your slide’s style.
Keep images clear and relevant. Avoid cluttering slides with too many visuals. Use Alt Text to describe images. This helps with accessibility and SEO.
Adding Charts And Tables
Charts and tables organize data, making it easier to understand. Use charts to show trends or comparisons. Use tables to display numbers or facts clearly.
To insert a chart:
- Click the Insert tab.
- Select Chart.
- Choose the chart type (e.g., bar, pie, line).
- Enter your data in the Excel window that opens.
To insert a table:
- Click Insert > Table.
- Select the number of rows and columns.
- Type your data directly into the table cells.
Tips for charts and tables:
- Keep data simple and easy to read.
- Use colors to highlight important parts.
- Label charts clearly with titles and legends.
- Align tables well within the slide layout.
Example of a basic table structure in PowerPoint:
| Item | Quantity | Price |
|---|---|---|
| Apples | 10 | $5 |
| Oranges | 8 | $4 |

Credit: www.computertutoring.co.uk
Design And Themes
PowerPoint makes creating presentations easy and visually appealing. The Design and Themes section helps beginners style their slides quickly. Good design grabs attention and keeps your audience focused. Themes provide a ready-made look with colors, fonts, and layouts. Understanding how to apply themes, customize backgrounds, and use slide masters gives you control over your presentation’s appearance. This part of the tutorial breaks down these concepts simply, so you can create polished slides without stress.
Applying Themes
Themes are sets of design elements that alter the overall appearance of your entire presentation. They include colors, fonts, effects, and background styles. Applying a theme saves time and makes your slides look consistent.
To apply a theme:
- Click the Design tab on the ribbon.
- Review the theme thumbnails displayed in the Themes group.
- Click a theme to see it applied to your slides.
Each theme has its own color palette and font styles. You can change themes at any time without losing your slide content.
| Theme Feature | What It Changes |
|---|---|
| Colors | Text, shapes, backgrounds |
| Fonts | Headings and body text |
| Effects | Shadows, reflections, and shapes |
| Background Styles | Slide backgrounds and textures |
Tips for applying themes:
- Select a theme that aligns with your topic and audience.
- Keep it simple to avoid distracting your viewers.
- Experiment with different themes to find the perfect look.
Customizing Backgrounds
Backgrounds provide a foundation for all content on your slides. You can customize them to match your style or message. PowerPoint lets you add colors, gradients, pictures, or patterns as backgrounds.
Steps to customize backgrounds:
- Go to the Design tab.
- Click Format Background on the right side.
- Choose a fill option: Solid color, Gradient, Picture, Texture, or Pattern.
- Adjust settings like color shades, transparency, or pattern style.
- Click Apply to All to change every slide, or close to change only the current slide.
Using backgrounds effectively can make your slides clearer and more visually appealing.
Background customization tips:
- Use light backgrounds with dark text for readability.
- Avoid busy images that distract from text.
- Try subtle gradients for a modern look.
- Match background colors with your theme colors.
Using Slide Masters
Slide Masters control the overall design of your presentation. They let you set layouts, fonts, colors, and placeholders once. Changes on Slide Masters apply to all slides linked to them.
Using Slide Masters helps keep your design consistent and saves time.
How to use Slide Masters:
- Click the View tab.
- Select Slide Master.
- The Slide Master view shows the main master slide and layout slides below.
- Make changes like adding logos, changing fonts, or adjusting placeholder positions.
- Close the Slide Master view to return to normal editing.
These changes apply to all slides that use these layouts. This way, you avoid editing each slide separately.
Benefits of Slide Masters:
- Consistent font and color use across slides.
- Easy to update design elements in one place.
- Save time by setting placeholders for text and images.
- Ensure professional, uniform presentation style.
Animations And Transitions
Animations and transitions add life to your PowerPoint slides. They help guide your audience’s attention and make your presentation more interesting. For beginners, learning these tools is simple and rewarding. You can create smooth changes between slides and animate text or images to highlight key points. This section explains how to apply slide transitions, add animations to objects, and control timing and effects for a polished presentation.
Applying Slide Transitions
Slide transitions control how one slide changes to the next. They make your presentation flow smoothly and keep the audience engaged. PowerPoint offers a variety of transition styles, including fades, wipes, and pushes.
To apply a transition:
- Select the slide you want to add a transition to.
- Go to the Transitions tab on the ribbon.
- Choose a transition effect from the gallery.
- Adjust the transition duration using the Duration box.
- Click Apply To All if you want the same transition on all slides.
Here is a quick look at popular transition types:
| Transition Type | Description | Best Use |
|---|---|---|
| Fade | Slides softly blend into each other | Professional and simple presentations |
| Push | New slide pushes the current one out | Dynamic and modern slideshows |
| Wipe | Slide appears with a wiping motion | Step-by-step or process presentations |
Using transitions sparingly keeps the presentation clear. Avoid too many different effects. Select styles that align with your message and personal style.
Adding Animations To Objects
Animations add movement to text, images, and shapes on your slide. They highlight important details and make your message clearer. PowerPoint has several animation types:
- Entrance: Object appears on the slide.
- Emphasis: Object changes while visible.
- Exit: Object leaves the slide.
- Motion Paths: Object moves along a path.
To add an animation:
- Click the object you want to animate.
- Go to the Animations tab.
- Pick an animation from the menu.
- Use the Animation Pane to see all animations on the slide.
Here are tips for effective animations:
- Use simple animations to avoid distraction.
- Animate key points for emphasis.
- Keep animation duration short (1-2 seconds).
- Use motion paths to show movement or flow.
Animations make your slides more dynamic. They guide the audience through your points step by step.
Timing And Effects
Timing controls when and how animations and transitions happen. Proper timing makes your presentation smooth and professional.
Key timing options include:
- Start: Choose when animation begins (On Click, With Previous, After Previous).
- Duration: Set how long the animation lasts.
- Delay: Pause before animation starts.
To adjust timing:
- Open the Animation Pane.
- Select an animation.
- Click the drop-down arrow and select “Timing.”
- Set start options, duration, and delay.
Effects add style to animations. You can change:
- Direction (e.g., from left, right, top, or bottom).
- Sound (add simple sounds to animations).
- Repeat (make the animation play multiple times).
Here is a table summarizing timing options:
| Option | Description | Usage |
|---|---|---|
| On Click | Animation starts with the previous animation | Animation starts after the previous one ends |
| With Previous | Control the pace of the presentation | Run animations together |
| After Previous | Control pace of the presentation | Chain animations automatically |
Good timing keeps your audience focused and avoids rushing. It helps deliver your message clearly and smoothly.
Presenting Your Slides
Presenting your slides is a key part of any PowerPoint tutorial for beginners. It turns your hard work into a clear and engaging story for your audience. Knowing how to start your slide show, using the right tools like Presenter View, and applying simple tips can make your presentation smooth and confident. This section helps you learn these skills step-by-step, making your first presentations easier and more effective.
Starting The Slide Show
Starting your slide show is the first step to sharing your ideas with an audience. PowerPoint offers several easy ways to begin your presentation. You can start from the first slide or from the slide you are currently working on.
- Press F5: This starts the slide show from the beginning.
- Press Shift + F5: This starts the slide show from the current slide.
- Click the Slide Show tab: Then select “From Beginning” or “From Current Slide.”
Starting correctly helps you stay organized and ready. Before you begin, check your slide order and content. Practice starting your slide show a few times to build confidence.
| Method | Shortcut | Starts From |
|---|---|---|
| F5 Key | F5 | First slide |
| Shift + F5 | Shift + F5 | Current slide |
| Slide Show Tab | Click “From Beginning” or “From Current Slide” | First or current slide |
Remember to have your presentation file ready and check your equipment. Ensure the projector or screen is set up before beginning. A smooth start builds trust with your audience and helps you feel more at ease.
Using Presenter View
Presenter View is a powerful tool for anyone presenting slides. It displays your notes, slide previews, and a timer on your screen only. Your audience sees only the main slides. This helps you speak clearly and stay on track without needing to refer to your paper notes.
- Enable Presenter View: Go to the Slide Show tab and check “Use Presenter View.”
- View your notes: See your speaker notes beside the slide.
- See upcoming slides: Know what comes next to prepare your words.
- Use the timer: Keep your presentation within the time limit.
Presenter View requires two screens: your laptop and the projector or external monitor. It works well for classrooms, meetings, or any professional setting. Practice with Presenter View to become familiar with the layout.
| Feature | Benefit |
|---|---|
| Speaker Notes | Helps remember key points without reading slides |
| Slide Preview | Shows next slide to prepare smoothly |
| Timer | Tracks time to manage presentation length |
| Control Buttons | Easy navigation between slides and annotations |
This tool increases your confidence and helps you avoid mistakes. It allows you to focus on connecting with the audience, rather than remembering every detail.
Tips For an Effective Presentation
Giving an effective presentation goes beyond clicking through slides. Good speaking skills and body language improve your message. Here are simple tips for better presentations:
- Practice: Rehearse your presentation several times out loud.
- Speak clearly: Use a slow and steady pace.
- Make eye contact: Connect with your audience to keep their attention.
- Use simple language: Avoid complex words or long sentences.
- Use visuals wisely: Let images support your words, not replace them.
- Pause: Give time for your audience to understand important points.
- Handle questions calmly: Listen carefully and answer clearly.
Body language also matters:
- Stand straight and face the audience.
- Use hand gestures naturally.
- Move around the stage or room if possible.
Remember, confidence grows with practice and preparation. Keep your slides clean and uncluttered. Use bullet points instead of long paragraphs. This helps your audience follow your message easily.
Saving And Sharing
Saving and sharing your PowerPoint presentation is a key step in making your work accessible and easy to distribute. Learning how to save your slides in different formats and share them through various methods helps you reach your audience effectively. This section explains simple ways to export, share, and print your presentations.
Exporting As PDF or Video
Exporting your presentation as a PDF or video makes it easy to share with others who might not have PowerPoint. PDFs keep your slides in a fixed format that anyone can open. Videos show your slides with all animations and timings.
To export as a PDF:
- Click File > Export.
- Select Create PDF/XPS Document.
- Choose your location and click Publish.
Benefits of PDF format:
- Easy to open on almost any device.
- Maintains slide layout and design.
- Not editable, which protects your content.
To export as a video:
- Go to File > Export.
- Choose Create a Video.
- Pick video quality (e.g., Full HD).
- Set timing for each slide or use recorded timings.
- Click Create Video and save.
Video export is useful for:
- Presentations with animations and voice narration.
- Uploading to video platforms.
- Sharing with people who do not have PowerPoint.
| Format | Best Use | Advantages |
|---|---|---|
| Static presentations | Easy to open, keeps design, not editable | |
| Video | Animated or narrated slides | Shows animations, easy to share, no PowerPoint needed |
Sharing Via Email Or Cloud
Sharing your presentation through email or cloud storage makes collaboration and access simple. You can send the file directly or share a link to the file stored online.
Email sharing steps:
- Save your presentation.
- Open your email and create a new message.
- Attach the PowerPoint file or exported PDF/video.
- Add recipients and send.
Email works best for small files and direct sharing.
Cloud sharing involves uploading your file to services like OneDrive, Google Drive, or Dropbox. After uploading:
- Create a shareable link.
- Set permissions (view or edit).
- Send the link to others.
Advantages of cloud sharing:
- Large files can be shared without email size limits.
- Multiple people can access and edit the file.
- Files are backed up and safe online.
- Save your presentation to OneDrive.
- Right-click the file and select Share.
- Choose permissions and copy the link.
- Paste the link into an email or chat.
Printing Slides And Handouts
Printing your PowerPoint slides or handouts helps your audience follow along during a presentation or keep a copy for study. PowerPoint offers several printing options to fit your needs.
To print slides or handouts:
- Click File > Print.
- Choose your printer.
- Select what to print from the Settings menu.
Print options include:
- Slides: Print one slide per page.
- Handouts: Print multiple slides per page (2, 3, 4, 6, or 9).
- Notes Pages: Print slides with your speaker notes.
Handouts with 3 slides per page show lines for notes. Good for audience use.
| Print Option | Description | Best For |
|---|---|---|
| Slides | One slide per page | Full slide view |
| Handouts | Multiple slides per page | Save paper, audience notes |
| Notes Pages | Slide plus speaker notes | Presenter reference |
Adjust print settings, such as color, orientation, and page range, to suit your needs. Preview your print before confirming.
Frequently Asked Questions
What Is PowerPoint and Why Use It For Presentations?
PowerPoint is a tool to create slideshows. It helps show ideas clearly and makes presentations more interesting.
How Do I Create My First PowerPoint Slide?
Yes, you can insert pictures and videos by clicking “Insert” and selecting the file from your computer.
Can Beginners Add Images And Videos Easily In PowerPoint?
Open PowerPoint, click “New,” choose a template, then add text and images to your slide.
How To Save And Share A PowerPoint Presentation?
Click “File,” then “Save As” to save. Use email or cloud services to share your file.
Conclusion
You have learned the basic steps to create a PowerPoint presentation. Practice these skills often to feel more comfortable. Try adding images and simple animations next. Remember, clear slides help your audience understand better. Keep your design clean and your text short.
Soon, making presentations will feel easier and faster. Keep exploring new features one step at a time. This way, your presentations will become more interesting and effective. Enjoy creating and sharing your ideas with confidence.
Read More-
Pros And Cons of Digital Devices in the Classroom
Where Can I Buy Digital Products to Resell