To make a data entry form in Excel using a macro, open Excel, press Alt + F11, and create a new macro. Write VBA code to design the form and define its functionality.
Data entry forms in Excel simplify data input tasks and reduce errors. Using a macro, you can automate form creation and data management. This method enhances productivity and ensures consistency in data entry. By leveraging VBA (Visual Basic for Applications), Excel users can design customized data entry forms tailored to specific needs.
These forms can include various controls such as text boxes, drop-down lists, and buttons. Creating a macro-based form requires basic knowledge of VBA coding, but it offers significant benefits in terms of efficiency and accuracy. Whether for personal use or business applications, Excel data entry forms can streamline workflows and improve data handling processes.

Credit: www.youtube.com
Introduction To Excel Macros For Data Entry
Excel Macros are powerful tools. They automate repetitive tasks in Excel. You can create a data entry form quickly. This makes data entry easy and efficient. Learn how to make your own data entry form.
The Role Of Macros In Automating Tasks
Macros can do repetitive tasks for you. They save you time. You can record a series of steps. Excel will repeat them for you. This is helpful for data entry tasks.
Here is what macros can do:
- Copy and paste data
- Sort and filter information
- Format cells and text
- Run complex calculations
Benefits Of Creating A Data Entry Form In Excel
Creating a data entry form has many benefits. It makes data entry easier. It reduces errors. It speeds up the process. Here are some key benefits:
- Improved Accuracy: Forms ensure consistent data entry.
- Time-Saving: Automated processes save time.
- User-Friendly: Easy for anyone to use.
- Data Organization: Keeps data organized and neat.
A data entry form can look like this:
| Field Name | Description |
|---|---|
| Name | Enter the person’s full name |
| Age | Enter the person’s age |
| Enter the person’s email address |

Credit: www.contextures.com
Prerequisites For Crafting A Data Entry Form
Creating a data entry form in Excel using macros can be a powerful tool. Before diving in, it’s crucial to have some prerequisites. This ensures a smooth process and successful results. Below are the essential requirements you need.
Basic Excel Skills Required
You need basic Excel skills to start crafting a data entry form. Here are some key skills:
- Understanding cell referencing
- Using basic formulas
- Navigating through worksheets and workbooks
- Formatting cells and text
These skills are fundamental. They help in creating a user-friendly data entry form.
Understanding The Excel Macro Environment
Knowing how to work within the Excel macro environment is vital. Macros automate repetitive tasks, saving time and effort. Here’s what you need to know:
- Enabling the Developer tab in Excel
- Recording a simple macro
- Editing a macro using VBA (Visual Basic for Applications)
- Running and testing macros
Let’s break down some of these points:
| Step | Description |
|---|---|
| Enable Developer Tab | Go to File > Options > Customize Ribbon > Check Developer |
| Record Macro | Click on Record Macro in the Developer tab |
| Edit Macro | Use VBA editor by pressing Alt + F11 |
| Run Macro | Go to Developer tab > Macros > Select > Run |
With these skills, you can confidently create and manage macros in Excel.
Designing The Data Entry Form Layout
Creating a data entry form in Excel using a macro can save time and reduce errors. A well-designed form simplifies data entry and ensures consistent results. This guide will help you design an efficient and user-friendly data entry form layout.
Key Elements Of A User-friendly Form
A user-friendly form includes several key elements. These elements ensure the form is easy to use and understand.
- Clear Labels: Each field should have a clear label. This helps users know what data to enter.
- Consistent Formatting: Use consistent formatting for labels and input fields. This improves readability.
- Input Validation: Validate data to prevent errors. For example, use drop-down lists for predefined options.
- Instructions: Provide brief instructions if needed. This helps users understand complex fields.
Organizing Fields For Efficient Data Entry
Organizing fields logically makes data entry efficient. Group related fields together and follow a natural flow.
- Group Related Fields: Place related fields next to each other. For example, group name and contact information.
- Use Sections: Divide the form into sections if it is long. This helps users focus on one part at a time.
- Tab Order: Set the tab order for fields. This allows users to move through the form quickly using the keyboard.
- Alignment: Align labels and input fields consistently. This improves the form’s visual appeal.
| Field | Label | Example Input |
|---|---|---|
| Name | Full Name | John Doe |
| Email Address | john.doe@example.com | |
| Phone | Phone Number | (123) 456-7890 |
Following these guidelines will help you create a data entry form that is both effective and easy to use. A well-designed form layout ensures users can enter data quickly and accurately.
Recording A Macro For Data Entry
Do you want to automate your Excel tasks? Recording a macro for data entry can help. A macro is a sequence of instructions. It allows you to automate repetitive tasks. You can record macros with just a few clicks.
Steps To Record Your First Macro
- Open Excel and go to the Developer tab.
- Click on Record Macro.
- Enter a name for your macro. Make sure the name is unique.
- Choose where to store the macro. You can store it in the current workbook or a new one.
- Click OK to start recording.
- Perform the data entry tasks you want to automate. Excel will record your actions.
- Click Stop Recording when you are done.
Assigning Macro To Form Controls
After recording your macro, you need to assign it to form controls. Form controls are buttons or other objects that can trigger the macro.
| Step | Action |
|---|---|
| 1 | Go to the Developer tab and click Insert. |
| 2 | Choose a form control like a button. |
| 3 | Draw the button on your worksheet. |
| 4 | Right-click the button and select Assign Macro. |
| 5 | Select your macro from the list and click OK. |
Now, your macro will run when you click the button.
Refining The Data Entry Process
Enhancing the data entry process in Excel involves making it accurate and quick. Using macros can automate many tasks, reducing errors and saving time. This guide will help you refine your data entry form using macros.
Incorporating Data Validation
Data validation ensures that users enter correct data. It can limit the type of data entered in each cell. This helps maintain data integrity. Follow these steps to incorporate data validation:
- Select the cell or range you want to validate.
- Go to the Data tab and click on Data Validation.
- In the Settings tab, choose the validation criteria.
- Specify the conditions for valid data entries.
- Click OK to apply the validation.
Data validation can include lists, numbers, dates, and custom criteria. This reduces the risk of incorrect data entries.
Automating Repetitive Tasks To Save Time
Macros can automate repetitive tasks, making data entry faster. You can record a macro to perform a series of actions. To record a macro:
- Click on the View tab.
- Select Macros and then Record Macro.
- Give your macro a name.
- Perform the tasks you want to automate.
- Click Stop Recording when done.
Now, you can run this macro to repeat the tasks anytime. This saves time and ensures consistency in your data entry process.
Using VBA code can further enhance automation. Here’s a simple example:
Sub EnterData()
    Range("A1").Value = "Hello"
    Range("B1").Value = "World"
End Sub
Copy and paste this code into the VBA editor. Run the macro to enter data into cells A1 and B1. This makes repetitive data entry much easier.
By incorporating data validation and automating tasks, you can significantly refine your data entry process in Excel.
Advanced Techniques And Troubleshooting
Creating a data entry form in Excel using macros can save time. Sometimes, you may encounter issues. Advanced techniques and troubleshooting can solve these problems. This section covers debugging common issues and enhancing functionality with VBA code snippets.
Debugging Common Issues With Data Entry Macros
When creating macros, errors can occur. Debugging helps fix these errors. Here are common issues and solutions:
- Syntax Errors: Check for missing parentheses or extra spaces.
- Runtime Errors: Ensure all variables are defined.
- Logic Errors: Verify the logic flow of the macro.
Use the debugging tools in Excel. These include the Immediate Window and Breakpoints. They help identify and fix errors quickly.
| Error Type | Common Cause | Solution |
|---|---|---|
| Syntax Error | Misspelled keyword | Check spelling |
| Runtime Error | Missing variable | Declare all variables |
| Logic Error | Incorrect logic | Review logic flow |
Enhancing Functionality With Vba Code Snippets
Enhance your data entry form with VBA code snippets. These snippets add advanced features.
- AutoFill: Automatically fill cells based on user input.
- Data Validation: Ensure accurate data entry with dropdown lists.
- Conditional Formatting: Highlight cells based on conditions.
Here is a simple VBA snippet to AutoFill a cell based on user input:
Sub AutoFillCell()
    Dim ws As Worksheet
    Set ws = ThisWorkbook.Sheets("Sheet1")
    ws.Range("B2").Value = ws.Range("A2").Value
End Sub
Use Data Validation to create dropdown lists:
Sub CreateDropdown()
    Dim ws As Worksheet
    Set ws = ThisWorkbook.Sheets("Sheet1")
    With ws.Range("A2").Validation
        .Delete
        .Add Type:=xlValidateList, AlertStyle:=xlValidAlertStop, Operator:= _
        xlBetween, Formula1:="Option1,Option2,Option3"
    End With
End Sub
Conditional Formatting can be added with this snippet:
Sub ApplyConditionalFormatting()
    Dim ws As Worksheet
    Set ws = ThisWorkbook.Sheets("Sheet1")
    With ws.Range("A1:A10").FormatConditions.Add(Type:=xlCellValue, Operator:=xlGreater, Formula1:="5")
        .Interior.Color = RGB(255, 199, 206)
    End With
End Sub
These snippets improve your data entry form. They make it more efficient and user-friendly.
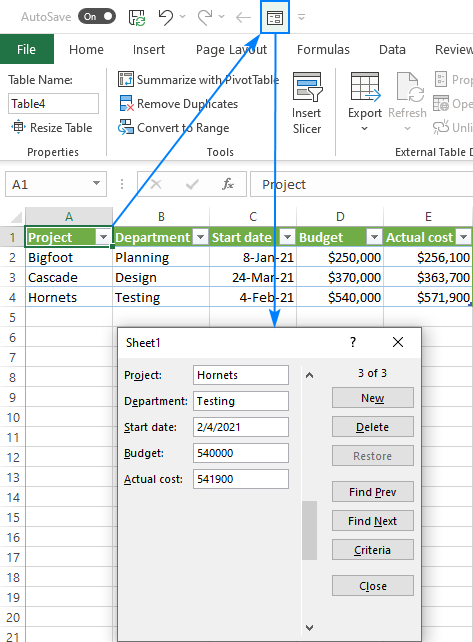
Credit: www.ablebits.com
Frequently Asked Questions
How To Create A Data Entry Form In Excel With Vba?
Open Excel and press Alt + F11 to access VBA Editor. Insert a UserForm. Add textboxes and labels. Write VBA code to handle data input and save. Assign a macro to a button for easy access. Save your workbook with.
xlsm extension.
How To Automate Data Entry In Excel Form?
Use Excel macros or VBA to automate data entry. Create forms using Excel’s Developer tab. Utilize Power Query for advanced automation.
How Do I Create A Form To Input Data In Excel?
To create a form in Excel, enable the Developer tab. Click “Insert,” then select “Form Controls” and choose your desired input fields.
How To Develop A Visitor Data Entry Form In Excel And Vba?
To develop a visitor data entry form in Excel using VBA, first design your form layout in Excel. Open the VBA editor and create a UserForm. Add text boxes, labels, and buttons to the UserForm. Write VBA code to handle data input and storage.
Save and test your form.
Conclusion
Creating a data entry form in Excel using macros enhances efficiency and accuracy. With this guide, you can easily automate tasks. Mastering these steps will streamline your workflow. Start implementing macros today to save time and reduce errors. Excel becomes a powerful tool with the right techniques.
Happy automating!